How it works
One technical rider, used by everyone: the band fills it in once, the AV company builds the stage from it, and changes on either side are agreed before the show.
New here? The step-by-step guide walks through a band’s first rider and festival, and through a festival stage from the AV company’s side. This page is the reference, with questions and answers at the end.
For bands · Rider Builder
Open the Rider Builder at /rider/. Everything you type is kept in this browser straight away; nothing is lost when you close the page.
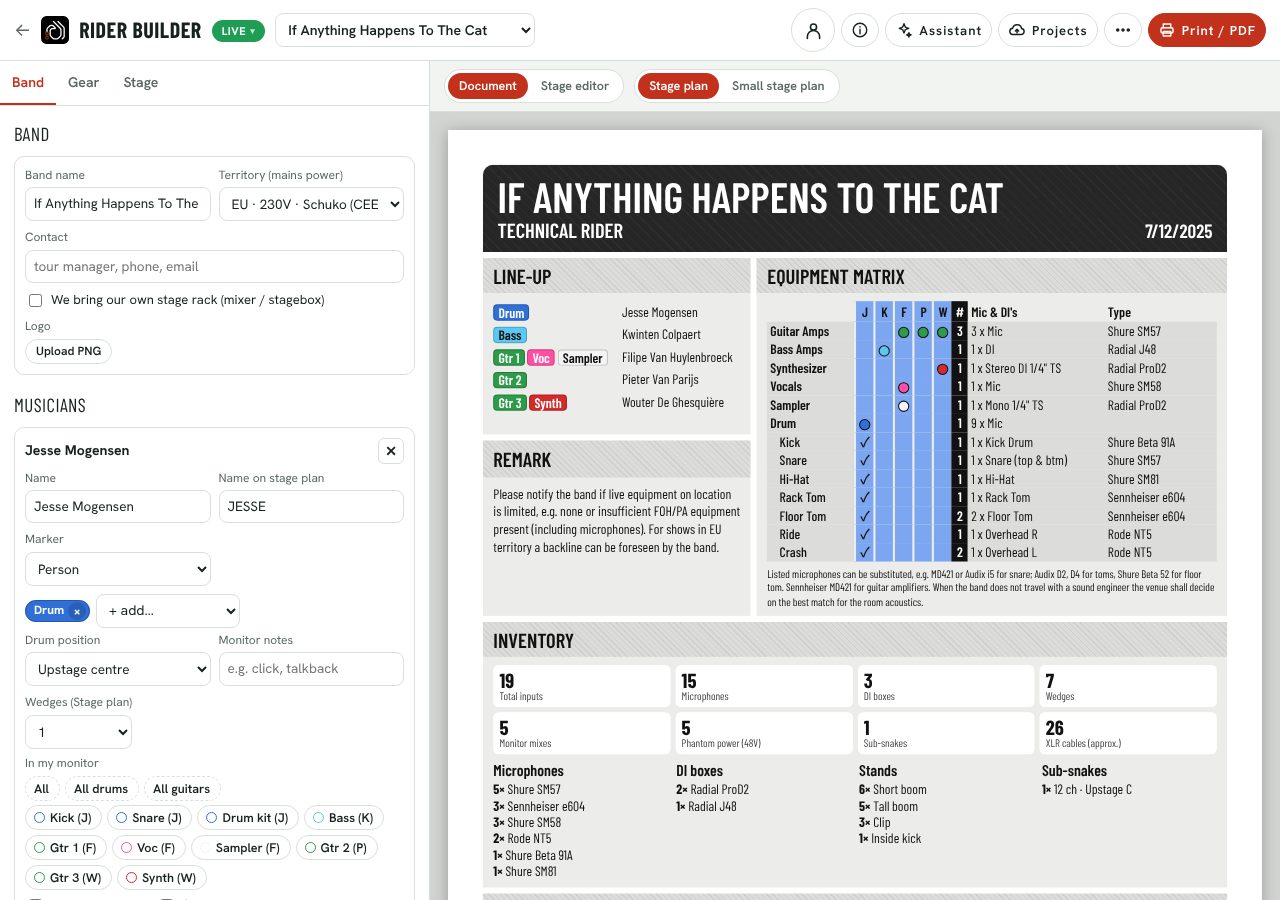
- Your riders on this device. Switch between them, or delete one.
- The editor: Band, Gear and Stage.
- Switch between the printed document and the stage editor.
- Your stage plans, e.g. a full plan and a small-venue plan, each with its own monitors.
- ⓘ: the guide, this help page and the FAQ. The 🌐 next to it switches the screen language.
- Projects: save the rider online, open older versions, and hand it in to events. On small screens this is the cloud icon.
- ⋯ More: New (an empty rider), Duplicate, Import and Export a rider file.
- Print, or save as PDF.
- The rider exactly as it prints, updated while you type.
1. Add the musicians
Add each musician with + Add musician and pick what they play from the list. The app fills in the inputs, mics, DIs, amps, wedges, stage plan, patch and power; you change anything afterwards.
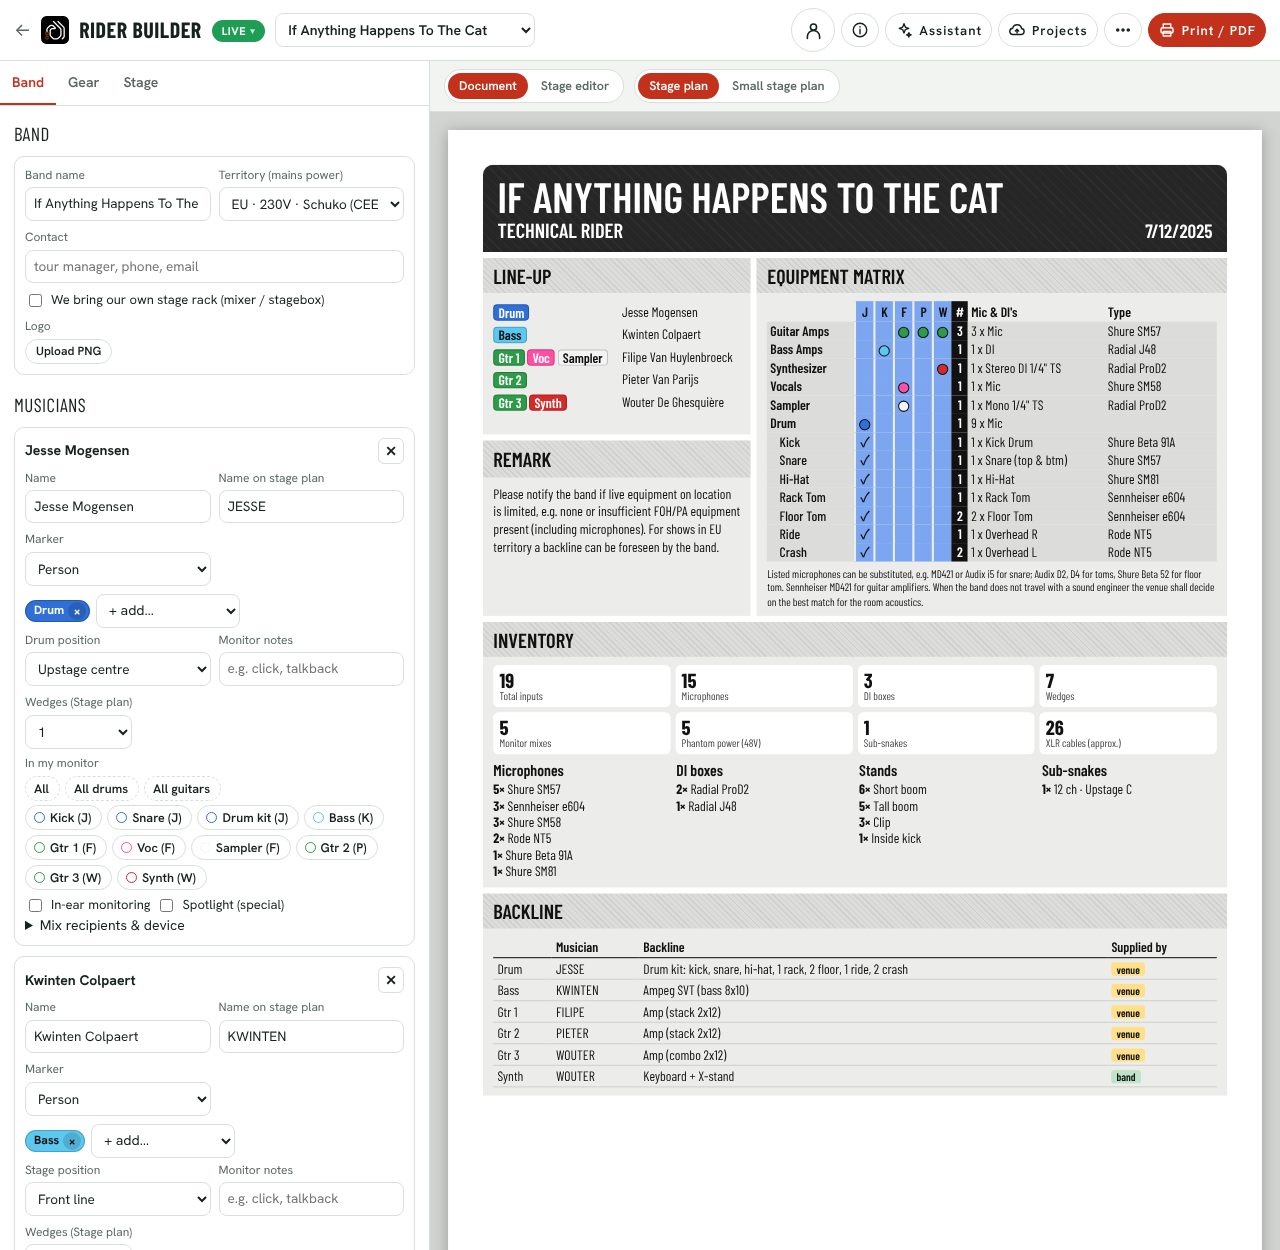
- Pick an instrument to add it to that musician.
- Where they stand: front line or back line (beside the drums); a drummer upstage centre, right or left.
- In my monitor: the band’s inputs, tap once for a bit, twice for lots; All, or All guitars and the like when there are three or more, does a whole group at once. They become the “In the mix” column and the monitor sends of the X32 scene.
- In-ear monitoring, and a spotlight: musicians with a spotlight get a numbered special on the lighting plan.
On the document, the summary cards (inputs, mics, DI boxes, wedges, monitor mixes, 48V) open a pop-up with a list of what they count. ◀ ▶ (or the arrow keys) step to the next card; ✕ closes it.
2. Gear
Say what you bring and what you prefer. Festivals match your preference against what they have.
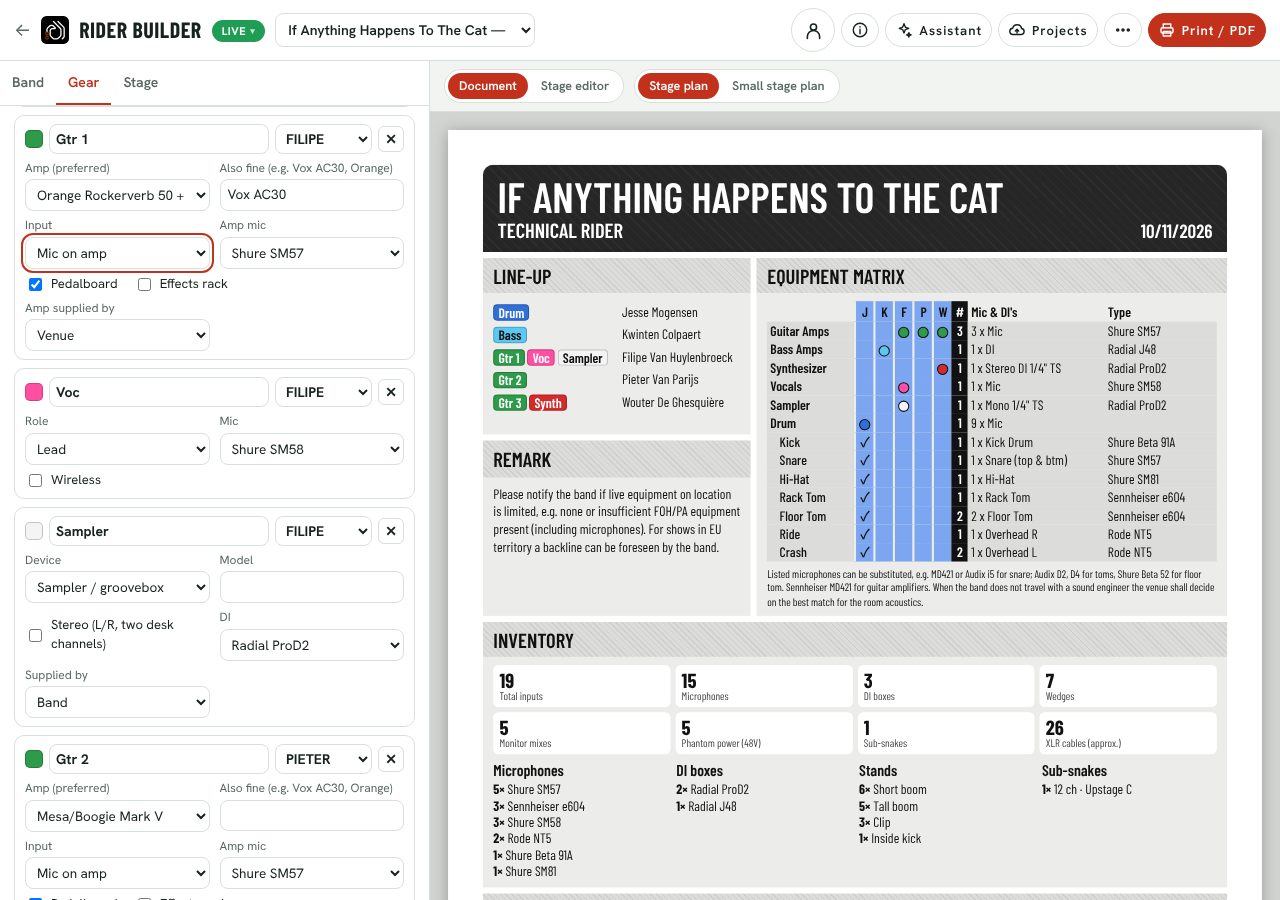
The Gear tab is short by default: what you bring and how each instrument connects (mic, DI, own DI). For a guitar or bass, the preferred amp and the alternatives are always shown, because the venue matches its backline to them. Tick More detail: models, mics & DIs to name a kit, synth, mic or DI too; most bands leave those to the venue. Pedalboard and Effects rack are side by side; with a rack, say where it stands (on stage or side stage).
- The amp you prefer, from a list of common models. The model sets the drawing on the stage plan; Other lets you type a model.
- What else is fine (“Vox AC30, Orange”). The AV company sees how well their backline matches.
- Mic on the amp, DI, or both. Mics and DIs are the venue’s choice unless you want a specific one, or bring your own DI.
- Who brings the amp: the venue, or the band.
Drums: say whether you use the house kit, bring your own snare, cymbals and pedal on a house kit, or bring your own kit. The kit table lists every piece as on a channel list, kick first and crash last, with − / + for how many; + Add to the kit… adds a piece. With More detail it also shows the mic per piece (a ride mic gives every ride a channel). A synth is mono unless you tick stereo (two desk channels, one stereo DI).
3. Stage plan
The plan is drawn as the audience sees it: the left of the drawing is stage right. Drag anything to move it (hold Shift for fine moves); click an item to rotate, hide or reset it. ↶ / ↷ above the plan (Ctrl+Z, Ctrl+Shift+Z or Ctrl+Y) undo and redo changes to the stage plan: moves, turns, hidden and added items. Wedges are drawn under the gear and stay at their depth: they slide sideways only, follow their musician, and never overlap: where they would, a wedge turns to aim at its musician, and if that is not enough it steps aside.
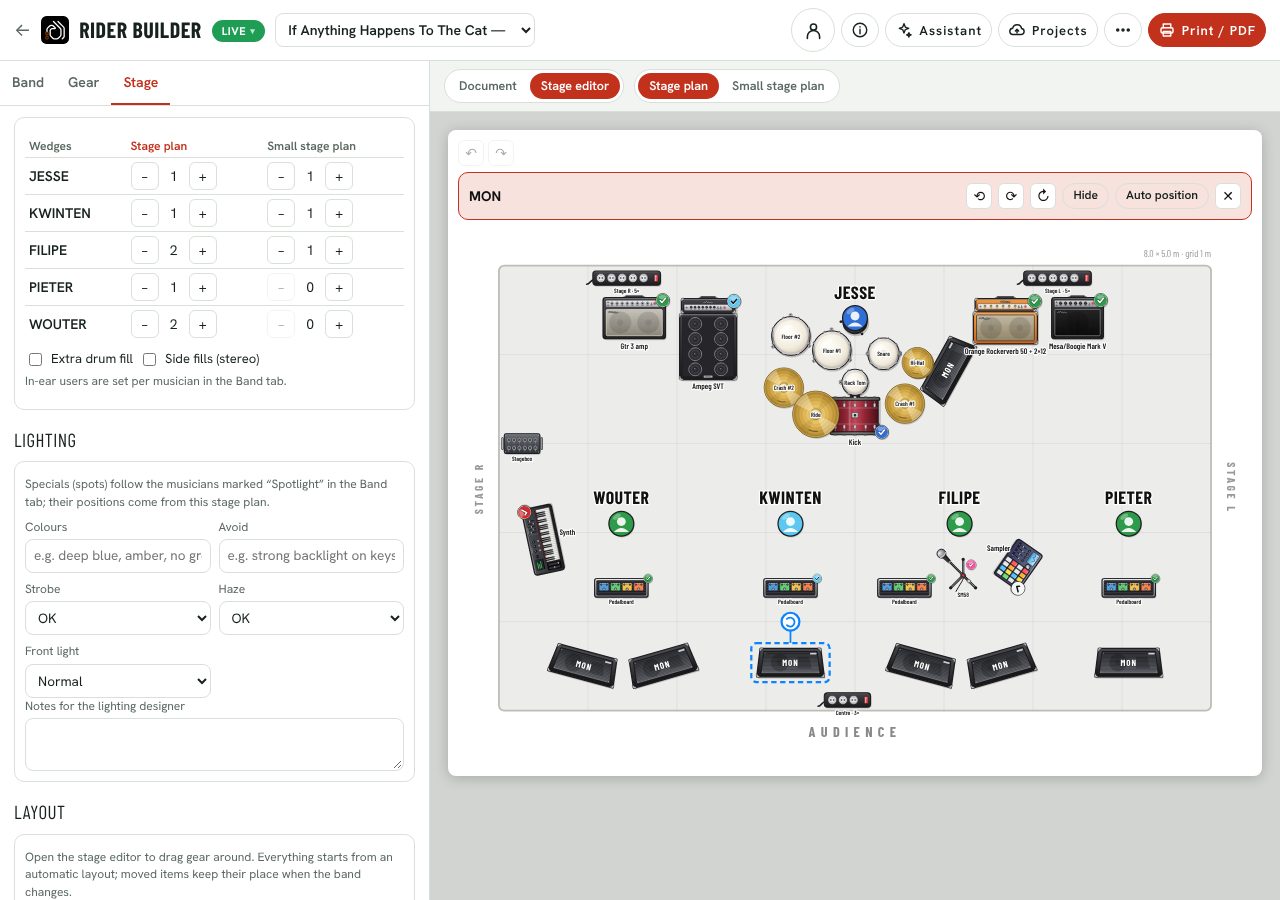
- Wedges per musician, for every stage plan side by side (− / +).
- Lighting wishes: colours, things to avoid, strobe, haze, front light, and notes for the lighting designer.
- The selected item: rotate, hide, or put it back in its automatic place.
- Drag gear around the stage. Moved items keep their place when the band changes.
- Stage right is on the left of the drawing; the audience is at the bottom.
4. Print
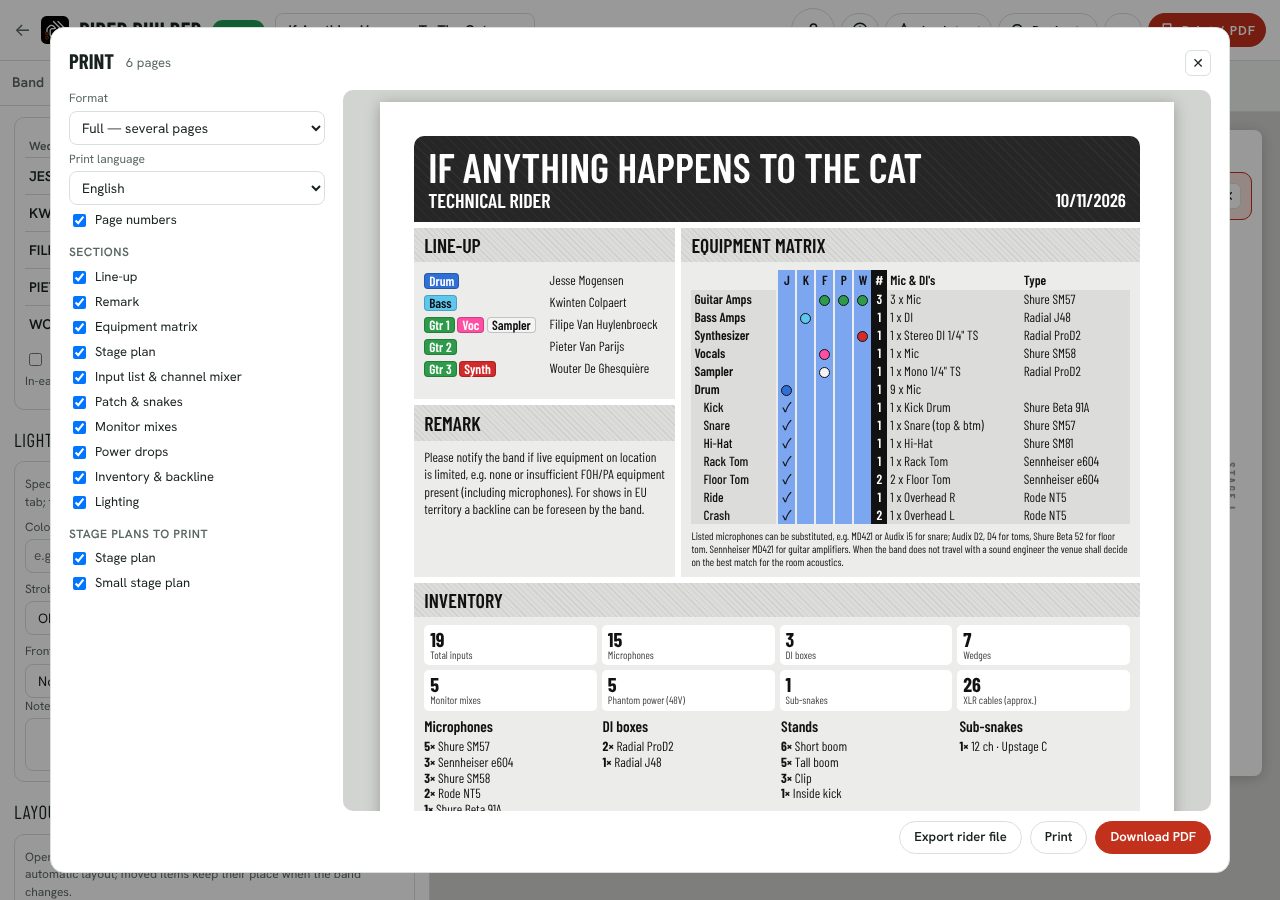
- Format. Condensed: one A4 page per stage plan, always the same layout. Full: several pages. Labels: a label per instrument (see labels).
- English, Chinese, or both side by side.
- Which sections (Full only) and which stage plans to print. Page numbers can be switched off here too.
- The pages as they will print.
- Download PDF (made by the PDF service, same pages); Print uses the browser’s print instead.
Save and recall projects
Open Projects. Riders on this device are listed first; sign in to keep them online, where the whole band can open them and every saved version is kept.
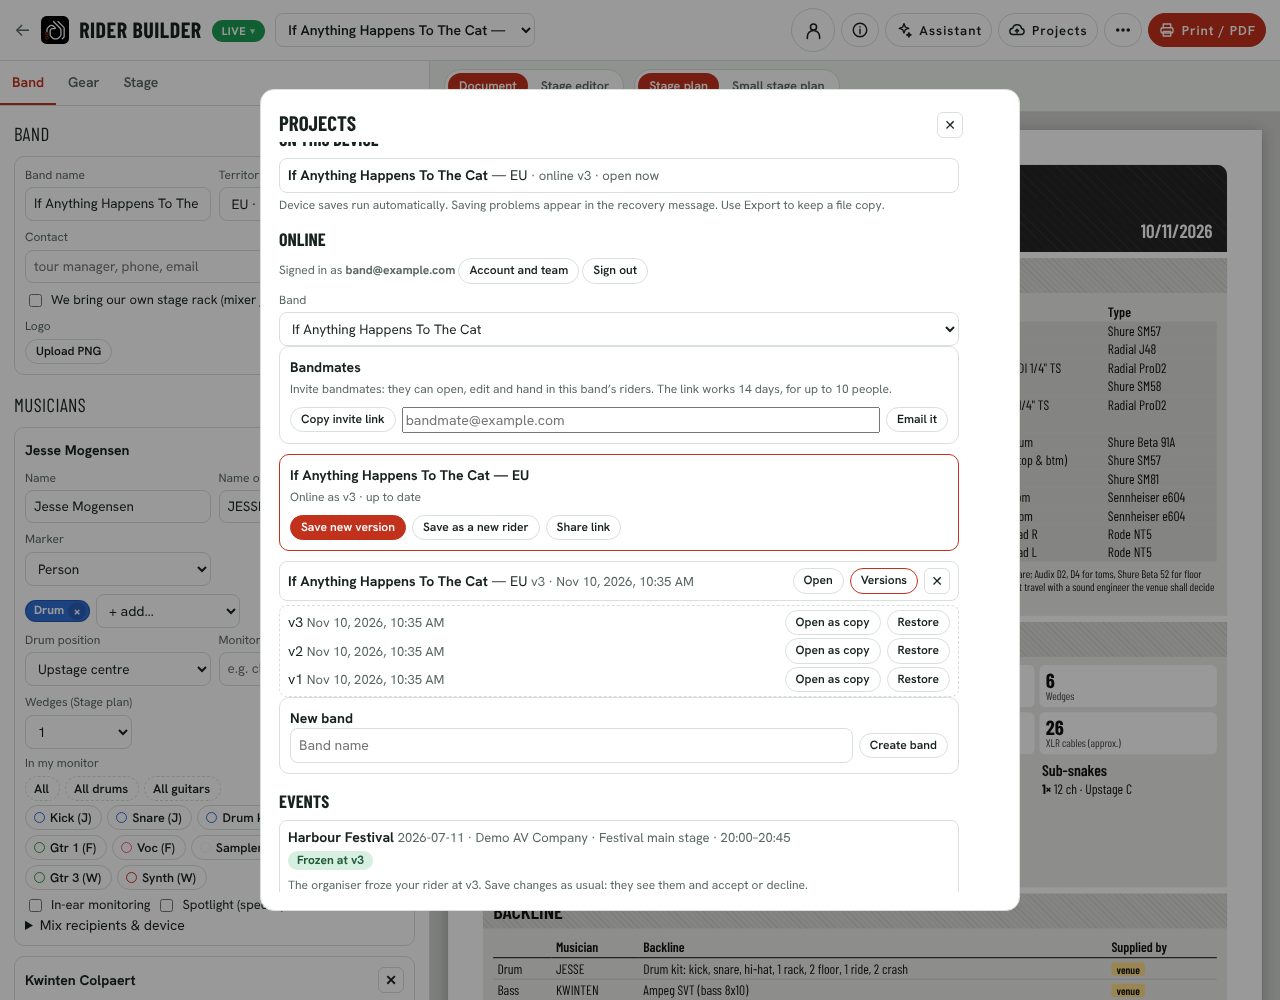
- Riders on this device, saved automatically.
- The rider that’s open now: save a new version online, or save it as a separate rider.
- Versions: every saved version. Open an old one as a copy, or restore it (restoring saves it as a new version, so nothing is lost).
- Events your band is invited to, and where your rider stands.
Signing in: see How do I create an account? A slot link, a share link or a rider request from an AV company also takes you straight to the right place after signing in.
Events and freezing
- The AV company sends you a slot link. Open it, sign in, and create your band (or pick it if it’s already on the platform).
- Save your rider online and hand it in. Until the AV company freezes it, they always see your latest saved version.
- When the AV company freezes your rider, they build the stage from that version. You can still save changes: they see them as “waiting for acceptance” and accept or decline (with a note you’ll see).
- If the AV company changes the stage after the freeze (house patch, backline, wedges), you’re asked to look at what changed and acknowledge it.
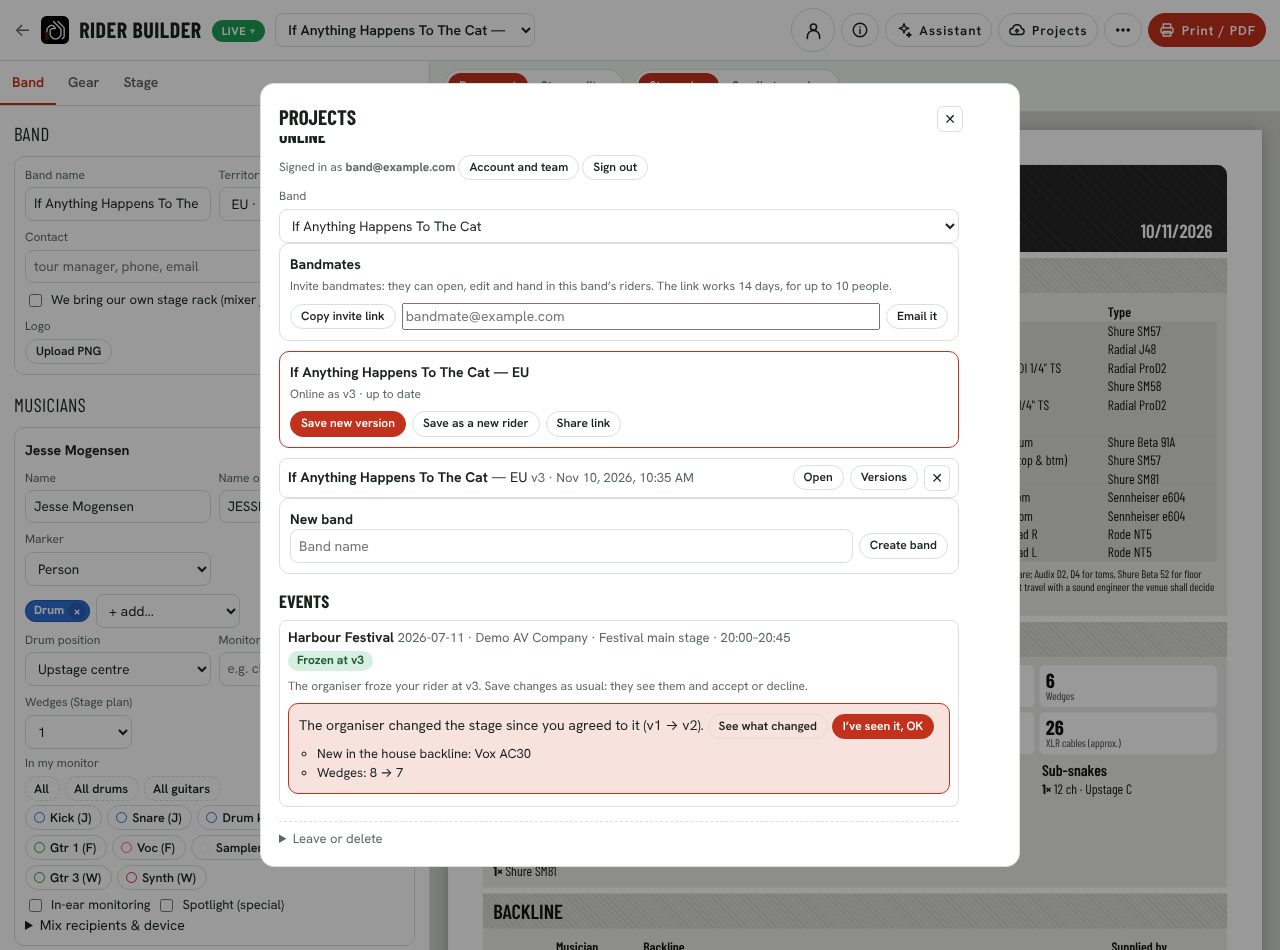
- Where your rider stands: frozen at a version, or an update waiting for acceptance.
- What the AV company changed on the stage since you agreed to it.
- Acknowledge, so they know you’ve seen it.
Share your rider with any company
An event invite isn’t needed to send your rider. Save it online, then share a link: the company opens your live rider in the browser, without an account, and always sees your latest saved version.
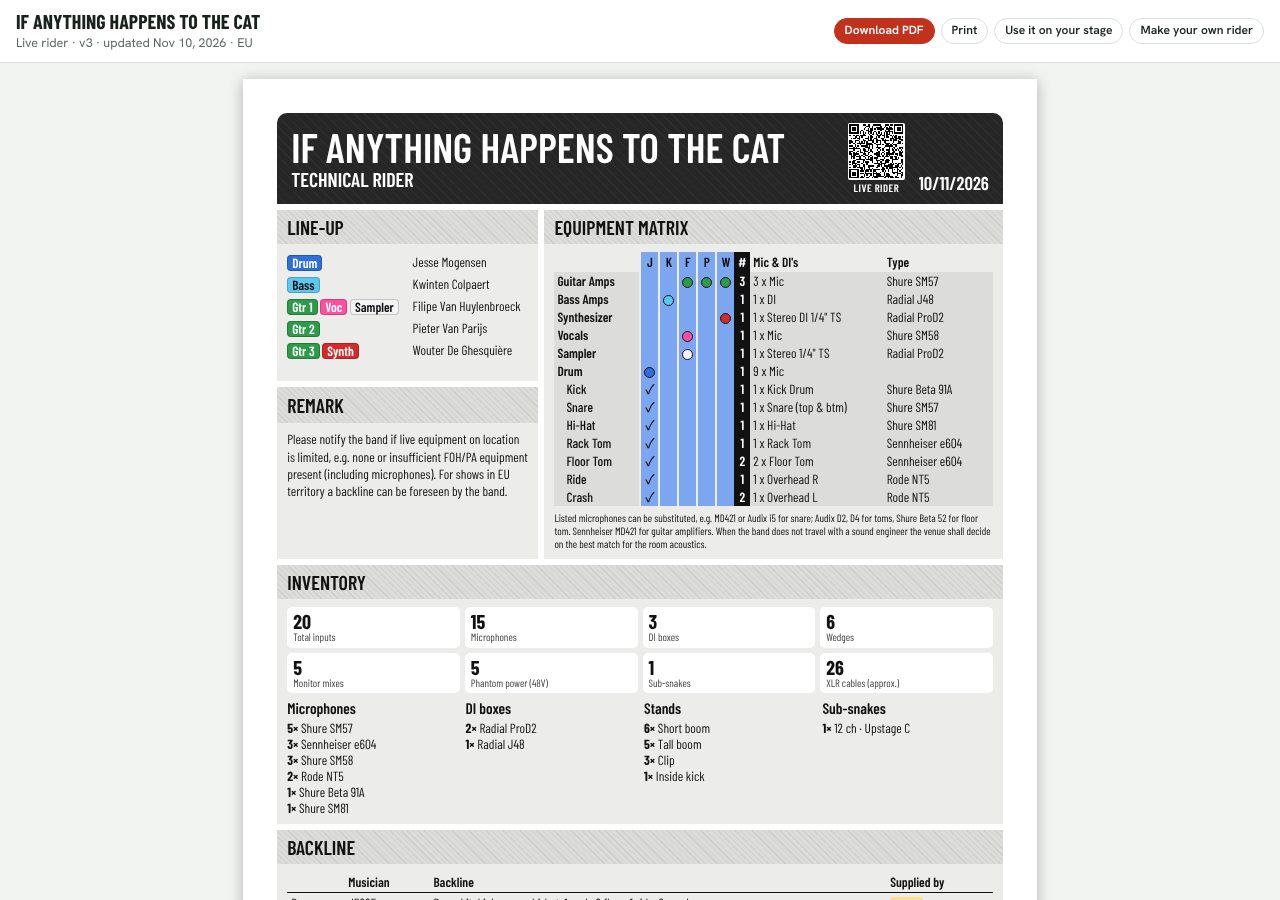
- The band, the version and when it was last saved.
- Download PDF (and Print next to it).
- Use it on your stage: brings the company to Crew.
- The QR code on every page: the same link.
- Projects → the open rider → Share link. The link is copied; send it by mail or chat. From then on your printed pages and PDFs carry its QR code (“Live rider”), so a forwarded PDF leads to the current version too.
- For one company, type its name under Shared with and press New link. Each link can be stopped on its own, without affecting the others.
- Shared with lists every link with its views, the companies that added it to their events, and how many companies signed up through it (★ next to a company that did).
- Stop ends a link: the shared page stops working and that company’s copy no longer follows your changes. What they already added stays with them.
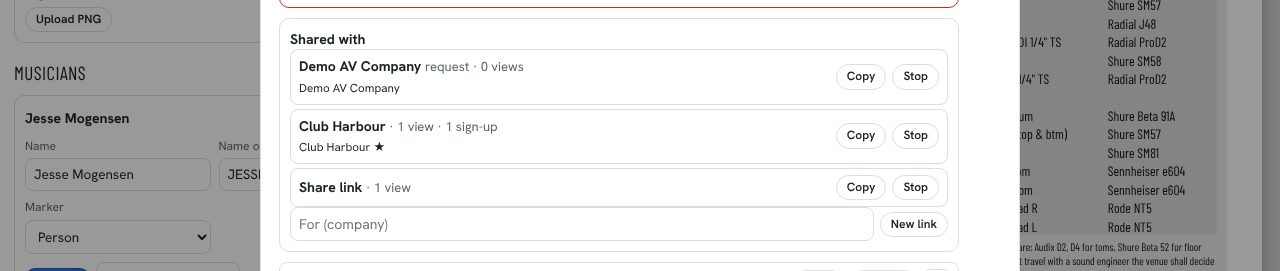
- Shared with: every link of this rider.
- A link made by answering a company’s request.
- The companies that added the link; ★ = signed up through it.
- Copy or Stop each link on its own.
- Name a company and press New link for its own link.
A company asks for your rider. An AV company or venue can send you a request link. Open it, sign in (or create your band from the link if it isn’t on the platform yet), pick one of your online riders and press Send to …. The company gets its own link, listed under Shared with as a request; stop it like any other.
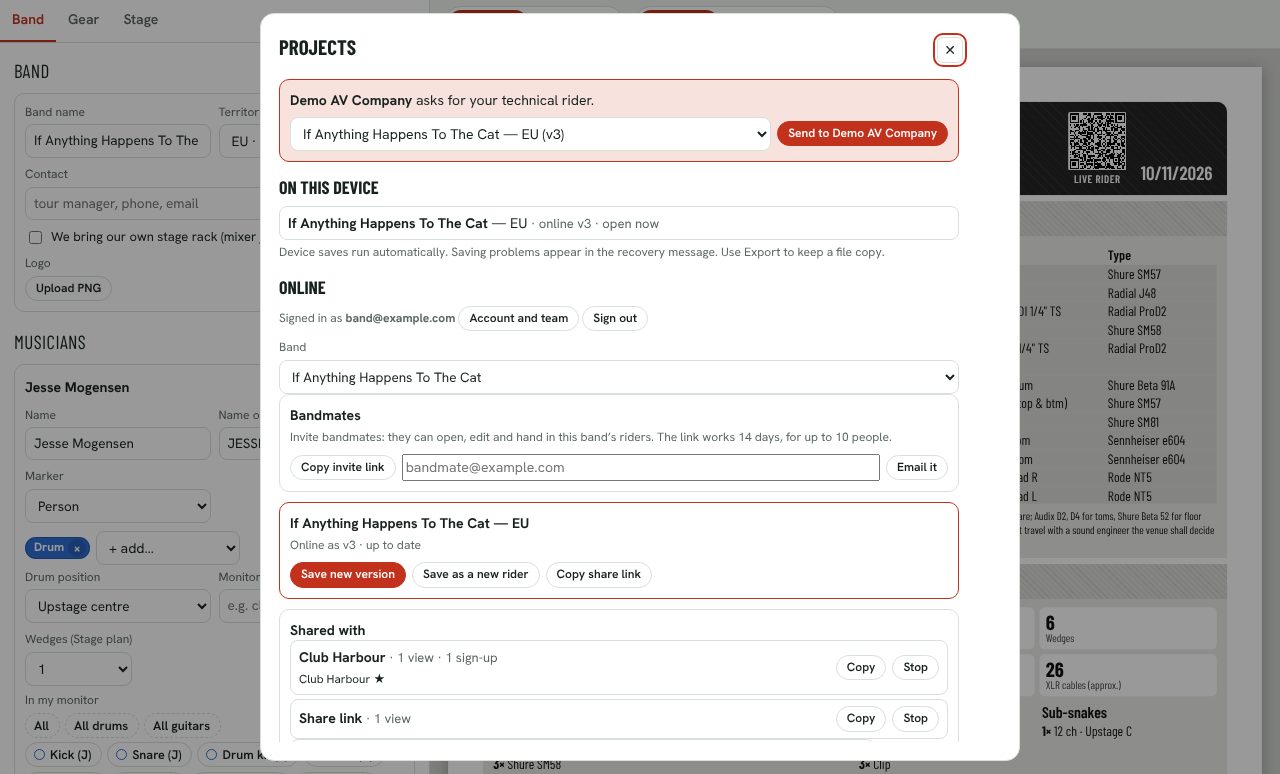
- Who asks.
- Which online rider to send.
- Send.
For the AV company · Crew
The AV company works at /crew/: stages (house patch, desk patch, inventory), events and running orders. Bands only ever see their own slot. The screens are for working. Only the Print / PDF window shows A4 pages.
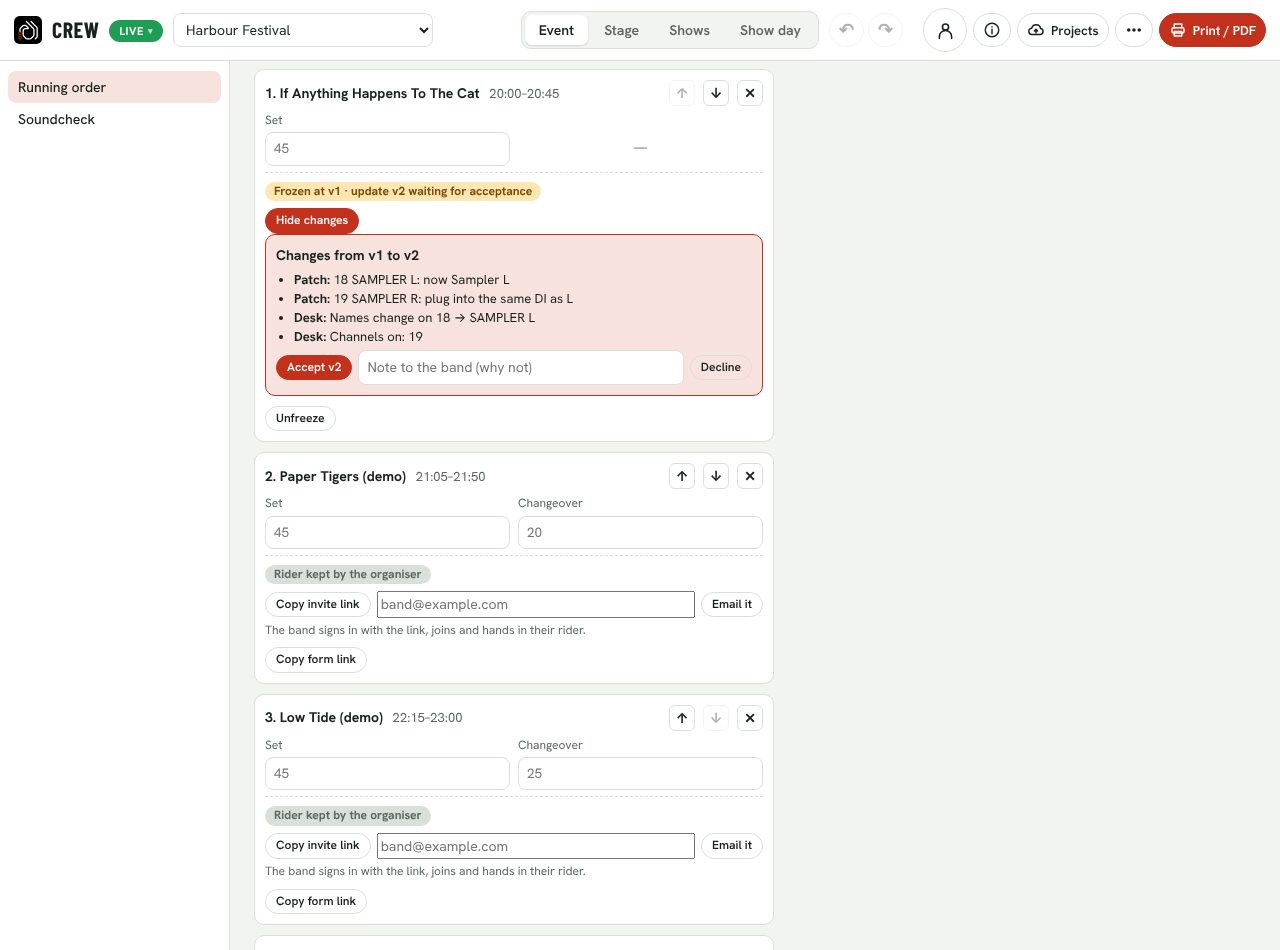
- The event you’re working on.
- The running order: bands and their set length (times are worked out from the timetable). Each band gets the stage plan of theirs that fits this stage and its wedges.
- A band’s update after you froze their rider: see exactly what it changes on your stage, then accept or decline with a note.
- The workspaces: Event (running order, soundcheck, timetable), Stage (house patch, desk patch, console, inventory, stage settings), Shows (each band on your stage) and Show day (changeover checklists).
- Projects: save the stage and the event online, check the bands’ status, and open earlier ones.
The top bar
- Event: the event you work on. For an event of more than one day, the list next to it shows one day or All days.
- Event, Stage, Shows, Show day: the four workspaces. The list on the left shows the sections, the bands or the changeovers of the workspace.
- ↶ ↷: undo and redo (see Undo and redo).
- ⚠ 3 shortages: shows only when something is short. Click it to open the shortages pop-up (see Shows).
- Projects: sign in, save the stage and the event online, invite colleagues, and check the bands’ status.
- ⋯ More → New event: an empty running order.
- Print / PDF: the Print window. Tick the pages (Timetable, House patch, Equipment, Per band, Changeovers, Labels: lines & stageboxes; Soundcheck changeovers when the soundcheck order is not the show order), choose the days, the print language and page numbers. Then Download PDF or Print.
Undo and redo
↶ undoes the last change; ↷ does it again. Keys: Ctrl+Z to undo, Ctrl+Shift+Z or Ctrl+Y to redo (⌘ on a Mac). Each change in Event, Stage, Shows and Show day is one step: a table cell, a dropdown, a tick, a drag, a fix. Typing in one field is one step. Up to 100 steps are kept while the page is open; when you reload the page, the history starts again. The keys do not work while you type in a text field or while a pop-up is open. The full-screen stage plan has its own ↶ ↷ for the moves you make there.
Event: running order and soundcheck
The Event workspace has two sections, with the day’s timetable beside them:
- Running order: the event’s name and stage; the date, first band on stage, doors, curfew and usual set length of the day; then each band with its set length, changeover, ↑ ↓ and ✕. + Day adds a day. Add a band takes a rider from the Rider Builder on this device, a band you removed, or a band from another event; + ? adds a slot for a band you don’t know yet.
- Soundcheck: the order of the soundchecks per day. It starts as the running order; move bands with ↑ ↓, or take a band out with ✕. Type each band’s start and end time.
A band added from the Rider Builder on this device stays in step with it: changes made in /rider show up in Crew straight away. The link is the band name: a band with the same name in the Rider Builder is the same band. A band invited online hands in new versions instead (see below).
Inviting a band
- Save the event online (Projects → Events → Save online). Each slot gets its own invite link.
- Copy the link and send it, or type the band’s email and press Email it.
- When the band has handed in their rider, press Freeze this version. From then on you work with that version.
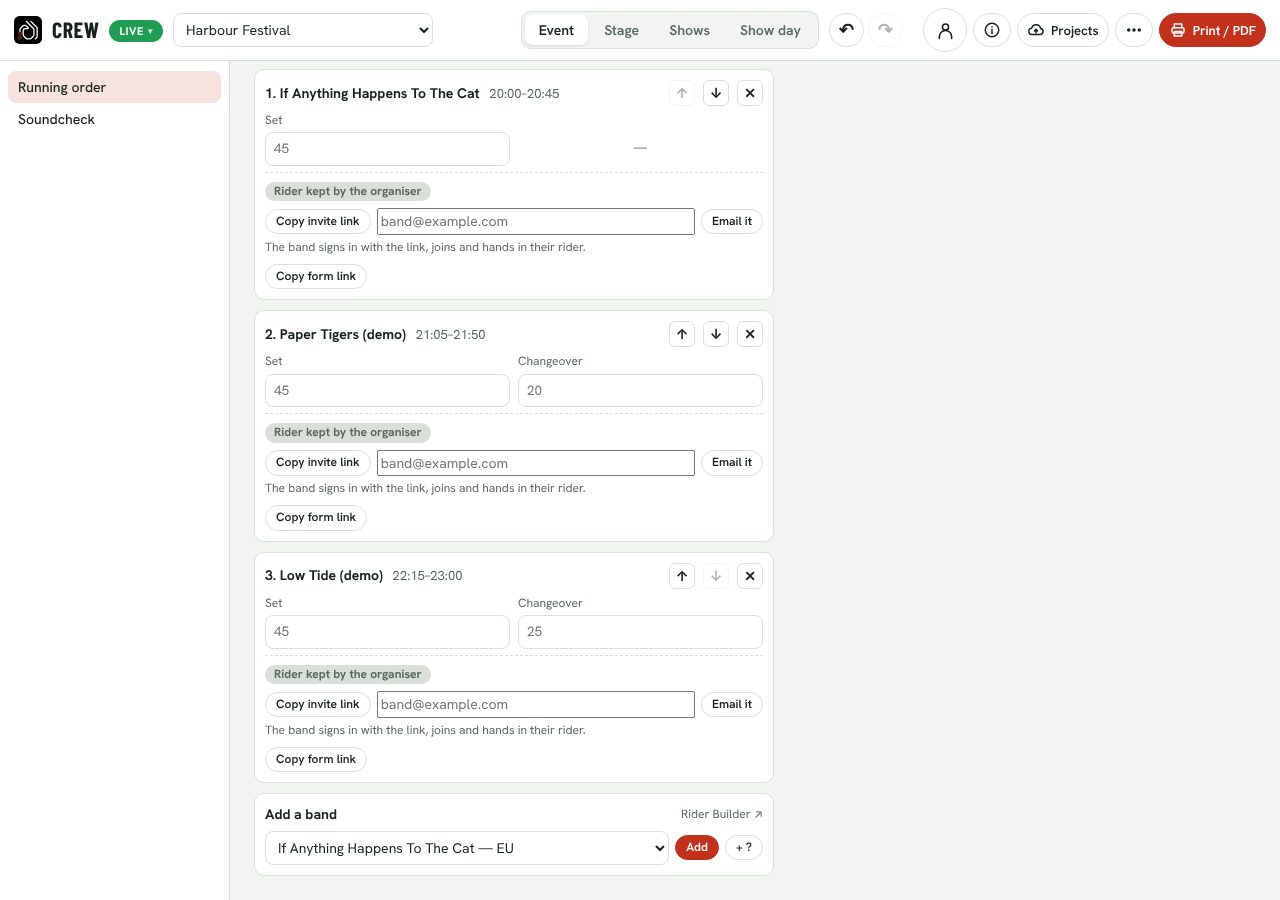
- The slot’s status. “Rider kept by the organiser”: the band hasn’t joined through its link yet, so you work with the copy you added.
- Copy the invite link for this band.
- Or type the band’s email…
- …and email it straight to them.
Riders from bands: share links, requests and the band form
- A band’s share link. It opens the band’s live rider; Use it on your stage brings you to Crew. Sign in, set up your company there if you don’t have one yet, pick an event and press Add to this event. The band joins the running order with its full rider, and a newer version the band saves replaces the copy by itself (Crew checks when it opens and when you come back to it).
- Request a rider. Projects → Riders → Request a rider copies a link for any band, no event needed. The band answers it from the Rider Builder (and can create its band from the link). The rider then appears in your Riders list: choose an event and press Add. Adding the same rider twice doesn’t make a second slot.
- Riders list. Every rider bands sent you or you added from a share link, with its version and date. ★ marks a band that signed up through your request; “no longer shared” means the band stopped the link.
- The band form. For a band that won’t use the app: on a saved event, each open slot has Copy form link. The band fills in a short form (musicians, instruments, amps, drum kit, monitors, notes) without an account and never sees the app; the answer becomes the slot’s rider. They can change it with the same link until you press Lock (Unlock opens it again).
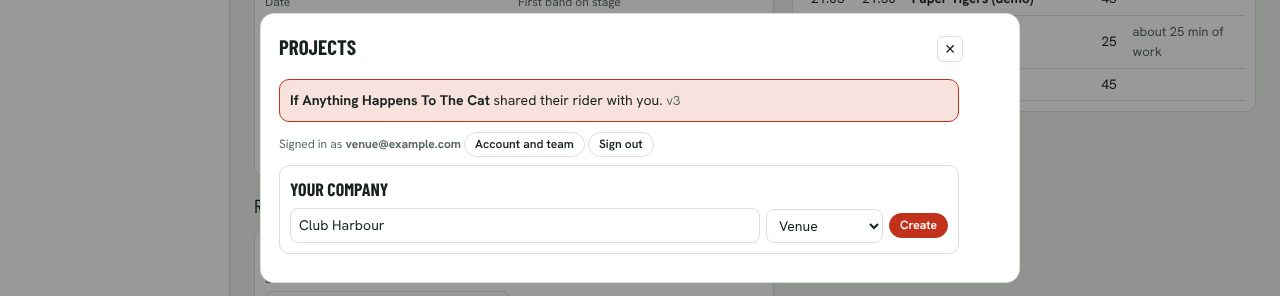
- The band that shared its rider with you.
- Your company’s name.
- AV company or venue.
- Create.
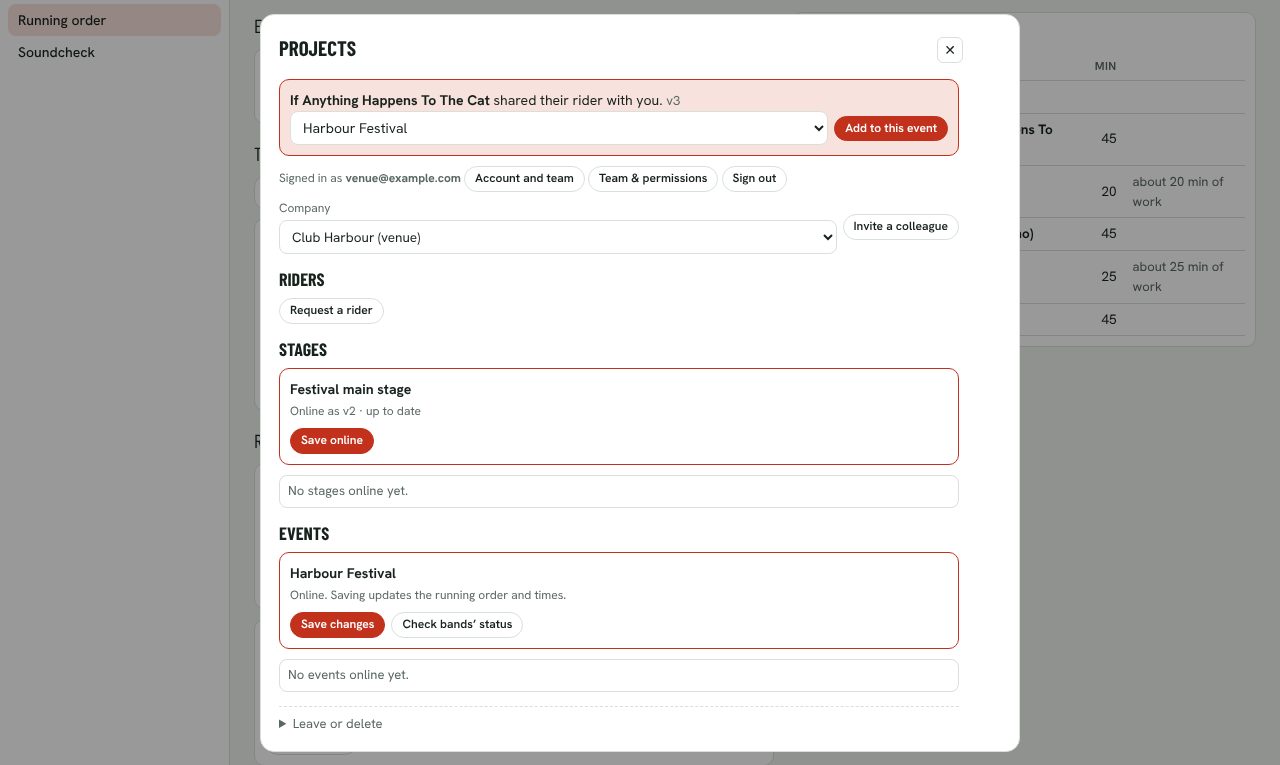
- The shared rider and its version.
- The event to add it to.
- Add to this event.

- Request a rider: copies a link for any band.
- A rider a band sent you, with its version and date.
- The event…
- …and Add.
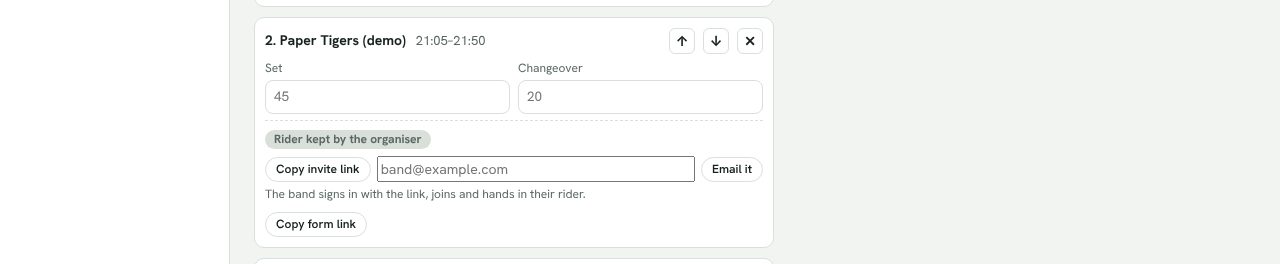
- Copy form link: the band fills in the form without an account.
- The invite link, for a band that uses the app.
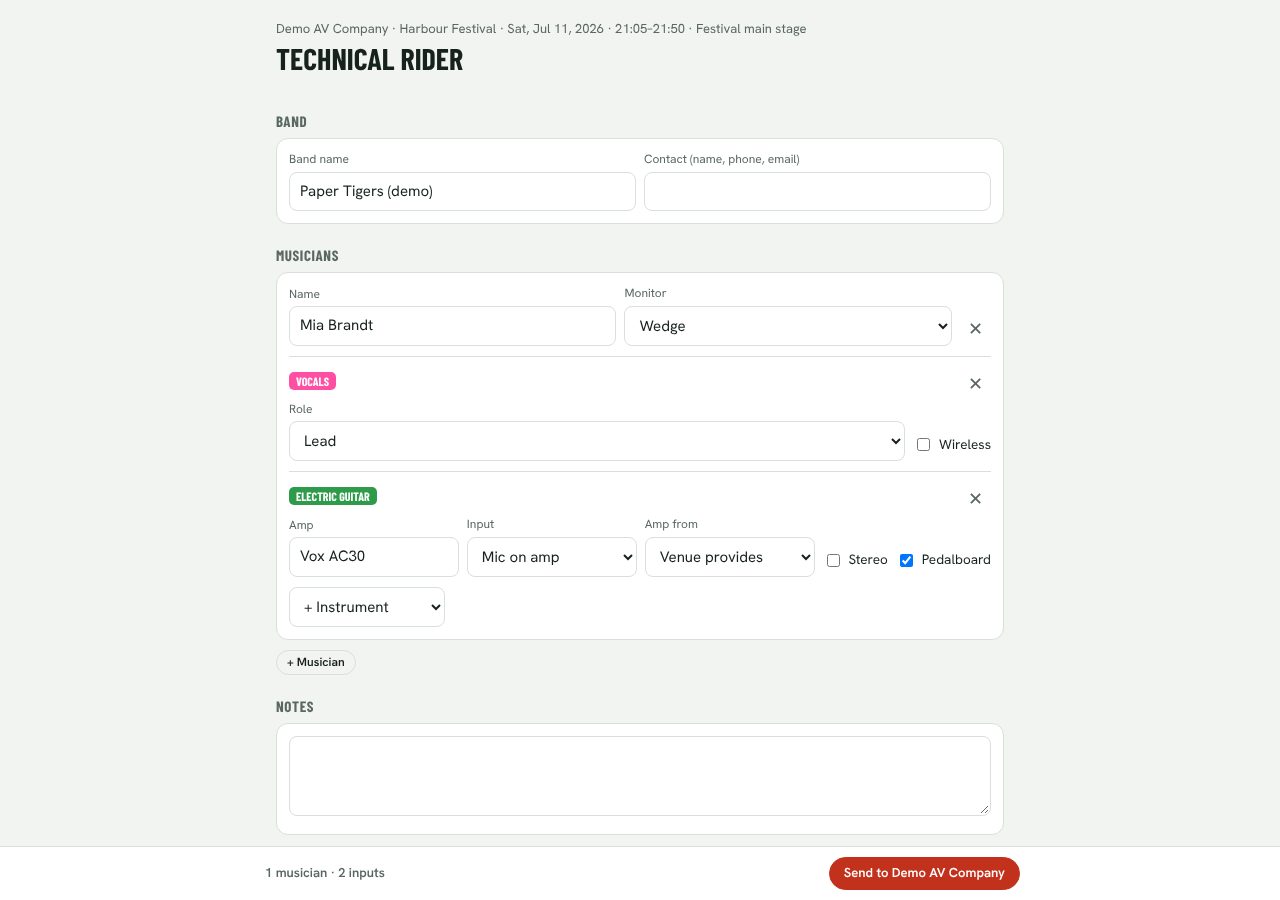
- The event and slot the form is for.
- Each musician, with wedge or in-ears.
- Per instrument, only what matters on stage.
- + Instrument.
- Send it to the organiser; the same link sends changes later.
Stage: house patch
The Stage workspace holds what stays the same from show to show. Its sections: House patch, Desk patch, Console, Inventory and Stage (name, AV company, console, mains, stage width and depth; New stage, Export stage file and Import).
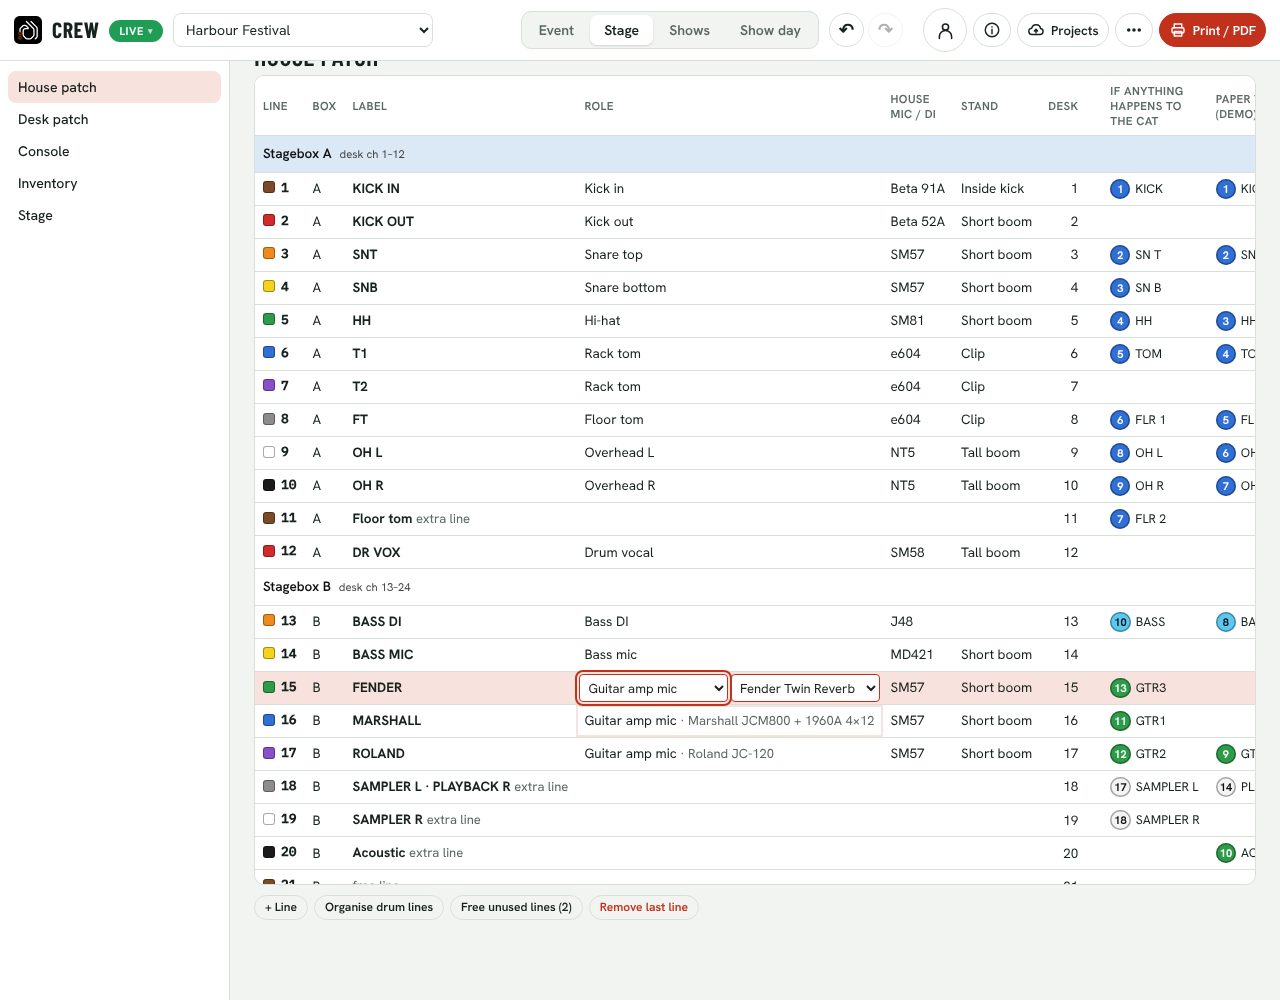
- Every line of your stageboxes, per box, with its colour and number. Click a cell to edit it in the table: box and label are text fields; role (and for a guitar-amp line, which house amp), house mic or DI and stand are dropdowns. Enter or a click somewhere else keeps the change; Escape undoes it.
- A guitar-amp line belongs to one of your house amps: the guitarist who gets that amp lands on this line.
- One column per band of the day: which of their inputs is on each line. The number in the dot is the band’s own channel number, next to the input name. Click a cell to choose the input yourself, keep the line empty (“kept empty”), or go back to automatic; the rest is worked out around your choice.
- The desk channel the line arrives on (from the desk patch).
- Inventory: your backline, mics, DIs and wedges.
Each input goes on a line of its own role first; a related line (a ride on OH R) only when nothing needs it; then a free line, on the desk first, in the stagebox where the rest of its instrument is. A line without a label is named after what the bands put on it. Giving a line a role that another line already has (snare top, Keys L …) swaps the two lines. Roles that can be on several lines (rack toms, floor toms, rides, guitar amps, DIs, vocals, percussion, other mics) don’t swap.
The buttons under the table:
- + Line adds a line; Remove last line removes the last one.
- Organise drum lines shows only when the drum lines are not in the usual order. It puts them at the top of the drum stagebox: kick in / out, snare top / bottom, hi-hat, rack toms, floor toms, ride, overheads, drum vocal, as many as the bands of the event need, with the free lines after them. Your choices per band on those lines are cleared.
- Free unused lines (n): lines with a role that no band of the event uses are dimmed (not in the drum stagebox). This button makes them free lines (no label, role, mic or stand), so they can take extra inputs.
Colours: each line has one colour, repeating every ten (1 brown, 2 red … 10 black); each stagebox has a background colour. See what the colours mean.
Stage: desk patch
Where each stagebox arrives on the console. The Stageboxes table has one row per box, with dropdowns:
- On the desk: the port. Local inputs, a network port of the console (AES50 on an X32, Dante on a Yamaha CL / QL, and so on), or not on the desk.
- First input: the first input of that port that the box uses.
- Channels: how many of the box’s lines go to the desk (the first ones). A 12-line box can send only its first 8; the next box follows on.
- First desk ch: the desk channel of the box’s first line.
The dropdowns only give what the console can do: nothing runs past the port or the desk. On an X32 / M32 the inputs are routed in blocks of eight, so first input and first desk channel are 1, 9, 17 …, and Channels is a multiple of eight or all lines. A box set to a new port starts on its first input.
Set it on the desk says what to set on the console: on an X32 / M32 the routing per block of eight (Setup → Routing → Home); on desks that patch per channel, the channels per port; a desk with fixed inputs needs nothing. Desk channels is the full list: desk channel, input, line and label. A warning shows when two boxes overlap, when a block doesn’t line up with the X32’s blocks of eight, or when lines don’t fit on the desk.
Stage: console
The console of your stage for one band at a time, in one row as on the desk and in a DAW mixer. Choose the band with ◀ ▶ or the list. Each channel is a column:
- On top, the matrix: Source (port and input), Line, Role, Input, Mic / DI and Stand. Click a cell to change it with a dropdown: the box’s port (Source), the line’s role or stand (for every band), which of the band’s inputs is on that line (Input), or a stand-in mic or DI for this band (Mic / DI, marked *). The Line row only shows the line.
- Then the channel strip in the look of the desk’s brand: 48V, select, mute (ON on a Yamaha) and fader.
- At the bottom, the name strip in the channel’s colour: channel number, name and the musician’s name.
Only the channels the band uses are shown. + shows the next unused desk channels, − hides them again. The mixes the band uses, the DCAs and the mains are in a row under the channels. A key above the channels marks the channels that come on or get a new name since the band before.
To change the band’s channel order on the desk, drag a name strip and drop it between two others. The channel numbers stay and the inputs move. The stage lines don’t change; the X32 scene follows the new order. ↺ Original order puts it back. The console has no routing screen: the routing is under Desk patch.
Stage: inventory
Tables: backline (kind, model, quantity, note, one row per item), microphones and DI boxes by model, and monitoring (wedges and monitor mixes). The model you pick sets the drawing on the plan. Bands asking for an amp or kit get the best match from this list.
Saving a new version of the stage after you froze a band’s rider asks that band to acknowledge the change.
Shows: each band on your stage
The Shows workspace has one screen per band (pick the band in the list on the left; the number is what is short). From top to bottom: what is short and how to fix it, their inputs on your house lines, the stage plan, monitor mixes, backline and the changeover from the band before. The printed Equipment pages (what the house gives out, with the peak per day, and the backline check) and Per band pages come from Print / PDF.
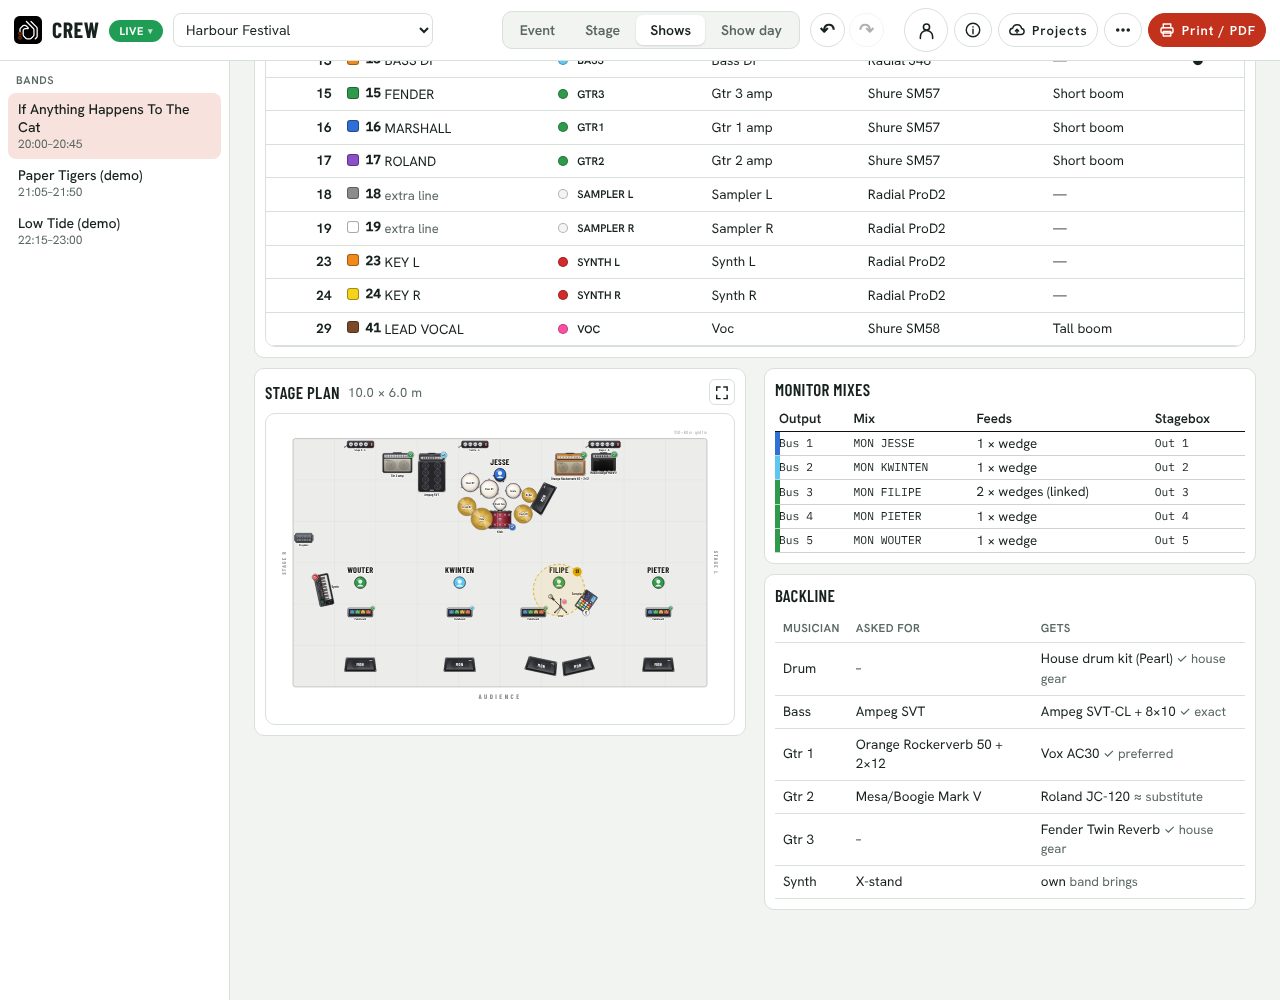
- What each musician asked for and what they get from your inventory.
- ≈ substitute: nothing matched what they asked for exactly.
- band brings: their own gear.
- The shortages of the day: click for what is missing, what it is for, and the fixes.
In the input list, Desk is the mixer channel and Line the house line (the cable).
Stand-ins. When a mic or DI is short, each input that uses it gets a dropdown: pick a spare item from your stock that does the same job (“2 spare”). The dropdowns are in the Mic / DI column of the band’s inputs and in the shortages pop-up. The band’s pages then say “instead of …”. Pick the original again to undo. The pop-up also has Add … to the inventory for gear you hire or bring in, and a button to the Inventory or the House patch.
The ⛶ button on the stage plan opens it full screen. Drag gear to move it on this stage; click an item to turn it. ↶ ↷ (Ctrl+Z, Ctrl+Shift+Z) undo and redo these moves. Your changes stay with that band on this event and go into the house patch and the changeover lists. Back to the band’s plan removes them.
Changeovers
For every switch between two bands there is a checklist per crew, with positions in metres from stage right. On Show day, pick the changeover in the list on the left and tick the steps off as the crew works. The bar shows how far the crew is; Clear ticks starts again. The ticks stay with the event. When the soundcheck order is not the show order, the list also has Soundcheck changeovers.
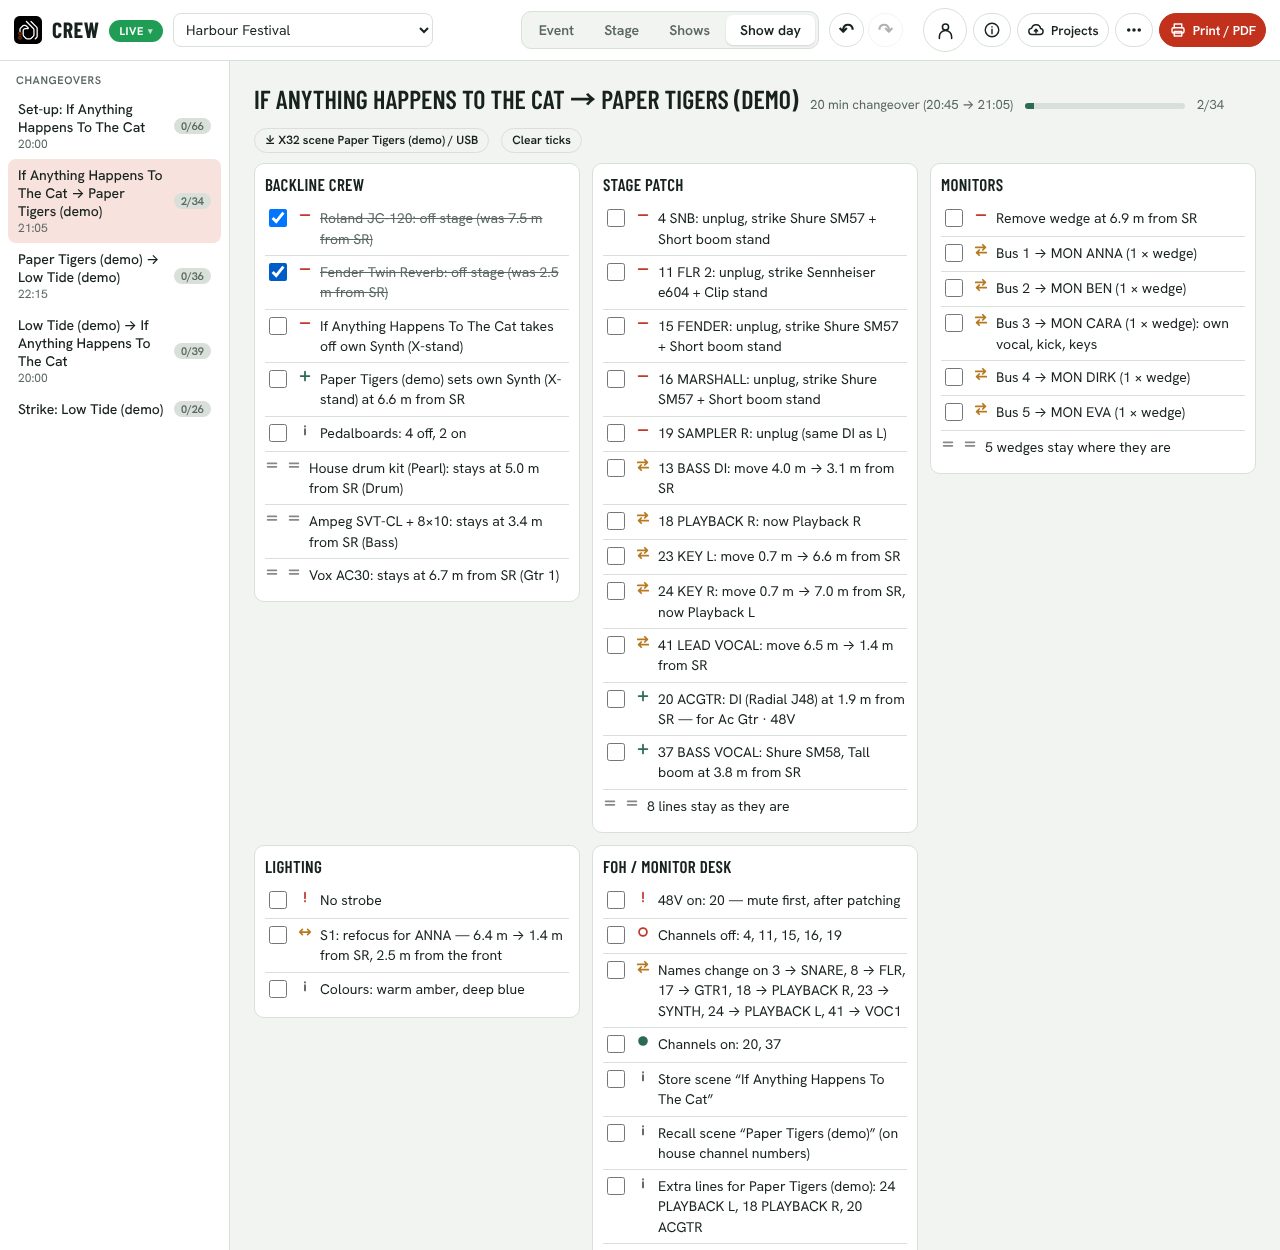
- Which changeover and how many minutes; the bar shows how far the crew is.
- The X32/M32 scene for the incoming band, on your house channel numbers (only when the stage has an X32 / M32).
- The backline crew: amps and kits off, on, moved or staying.
- Stage patch: lines to unplug, plug, swap or move.
- Monitors: wedges to move, add or remove, and what each mix feeds.
- A step done: tick it off.
- Every changeover of the day, with the steps done so far. Lighting and the desk follow below.
A prototype of a mobile field app for the crew is at /crew/app/. It shows the same event on this device, with the same changeover ticks. Five tabs:
- Now: the running order with what is on now and the next changeover.
- Stage: each band's plan. Wedges, Power and Musicians switch layers on and off; tap a musician to fade everyone else (icon, name, instruments, amps, pedalboards). Tap an item to open it. Double tap the plan for full screen: pinch to zoom, drag to scroll, double tap again to close.
- Console: one band at a time, as the desk (a column per channel in use: source, line, role, input, mic / DI and stand, then 48V, mute, fader and the name strip with the musician) or as the house patch with the numbered dots. Tap a column or a line to open it.
- Routing: every house line against every band, as numbered dots. A dot with a slowly flashing dashed red ring needs 48V. Tap a dot for the full path.
- Views: timetable, house patch, gear, per band, changeovers and labels as live screens. Gear shows mics, DIs, wedges, monitor mixes and stands against what the house has; tap one to see where it is used, and Side stage lists each band's drum set-up for the riser. Print on a view opens the Crew print window with that page; Export all prints the full bundle.
Questions and answers
From bands, AV companies, sound and lighting engineers. Type a word to filter.
No question matches. Try another word, or read the guide.
Signing in and access
Can I try it out first?
Yes: use the Test environment (the yellow label next to the app name, or add ?env=test to the address). It has every feature, with data kept apart from the real platform; Test data may be wiped.
Switch to Live for the real platform. Your account works in both; projects on your device are kept per environment.
How do I create an account?
Choose Create account in the sign-in box (or on the Account page), or Continue with Google. With email and password, confirm the address from the email you receive, then sign in. Forgot password? sends a reset link; Use an email code signs you in without a password.
Once signed in, create your own band (Rider Builder → Projects) or AV company / venue (Crew → Projects), or open an invite link to join an existing one. A band can also start from the slot link an AV company sends for its event.
You don’t need an account to build, print or export a rider: everything except the online part works without one.
Can I protect my account with two-step verification?
Yes. On the Account page, under Two-step verification, choose Set up authenticator app, scan the QR code with an app such as Google Authenticator, 1Password or Authy, and enter the 6-digit code. From then on you are asked for a code after your password, Google or email sign-in. Lost your phone? Ask the platform admin to reset it.
I didn’t get the sign-in email.
- Look in your spam or promotions folder.
- Check the address. Use the one the organiser invited; Other address lets you correct a typo.
- Wait a minute and send it again: asking again straight away may be refused for a short while.
- The email contains a link and a code. If it opens on another device (say, your phone), type the code in the window where you asked for it; clicking the link signs in the device that opens it.
How long do I stay signed in?
In this browser until you press Sign out in Projects. On a shared computer, sign out when you’re done; the riders on the device stay there either way (delete them from the rider list if needed).
Can my bandmates work on the same rider?
Yes. Riders saved online belong to the band: every member can open them, see all versions and save new ones.
To add someone: Projects → Bandmates (band owners only) → Copy invite link, or type their email and press Email it. The link works for 14 days and up to 10 people. They open it, sign in, and press Join.
How do I add a colleague to my AV company?
The owner of the company opens Projects in Crew and presses Invite a colleague. That copies a link (valid 14 days, for up to 10 people). Your colleague opens it, signs in and presses Join; they can then edit stages and events and handle the bands’ riders.
Your rider and the AV company
Who sees my rider?
- On this device only you: riders stay in this browser until you save them online.
- Online: the members of your band.
- The AV company of an event you hand it in to: from then on they see that rider, its later saves and its earlier versions.
- Anyone with a share link: your latest saved version, read-only, until you stop that link (Projects → Shared with).
- Other bands on the same event see the event and the stage, never your slot or your rider.
Band and company names are visible to everyone who is signed in, so organisers can find you.
A company asked for my rider. What do I do?
Open their link, sign in, pick the rider and press Send to …. No band on the platform yet? Create it from the same screen first. They then always see your latest saved version until you stop the link.
What does the ★ mean?
In your Shared with list: that company signed up through your link. In a company’s Riders list: that band signed up through the company’s request.
Can a band hand in a rider without an account?
Yes, with the band form: the organiser copies a slot’s form link (Crew → Projects, on a saved event) and sends it. The band fills in the form and sends it; it becomes the slot’s rider. The same link changes it until the organiser locks it.
What does “hand in” do, and which version does the organiser get?
Hand in links one of your online riders to your slot. Until the organiser freezes it, they always work with your latest saved version (“Following the band’s latest”). Changes that are only on your device don’t count: save a new version in Projects first.
Until the freeze you can also hand in another rider (“Hand in this one instead”). The organiser chooses which of your stage plans they use on their stage, for example your small-venue plan.
What does “frozen” mean?
The organiser pressed Freeze this version: they now build the stage (patch, backline, changeovers) from that exact version, and your later saves no longer change their copy.
You can still edit and save. Each new version reaches them as an update to accept or decline. After the freeze you can’t hand in a different rider for that slot. The organiser can unfreeze, and then follows your latest version again.
Why does my change say “waiting for acceptance”?
Because your rider is frozen. Until the organiser accepts, they keep working with the frozen version. They see your update as changeover steps (“add wedge at 1.1 m from SR”, “channels on: 26”) and accept or decline it.
The organiser’s screen doesn’t refresh by itself: they see your update after they press Check bands’ status in Projects. If it’s urgent, tell them.
My update was declined. Now what?
The organiser keeps your frozen version. Their note is shown under the event in Projects (“Their note: …”). Talk to them, change the rider, and save a new version: it is waiting for acceptance again. To go back to what they accepted, restore that version (see the next question).
“The organiser changed the stage since you agreed to it.” What do I do?
After the freeze, the AV company may still change their stage: house patch lines, house mics, backline, wedges, monitor mixes or stage size. Press See what changed for the list, and I’ve seen it, OK to let them know. They see who still has to acknowledge.
How do I get an older version back?
Projects → Versions next to the rider. Open as copy opens that version as a separate rider on this device (marked “(vN)”), without changing anything online. Restore saves the old version as the newest version; nothing is lost. If your rider is frozen for an event, a restore is an update like any other and waits for acceptance.
What happens if two people edit the same rider?
Each person edits their own copy in their own browser. The first to save online wins; the second is told “Someone saved a newer version of this online” and can either open the online version first (their unsaved changes are replaced after a warning) or save theirs as a new rider.
On one device, keep a rider open in one tab only: two tabs save over each other.
Does it work offline?
Once the page is open, yes: editing, the stage editor, printing and exports work without a connection, and everything is saved in the browser. Projects (signing in, saving online, versions, events) needs a connection.
Opening the page without a connection works only if this browser has a saved copy from an earlier visit. Before you travel, print a PDF and Export the rider file (⋯ More → Export).
How do I delete my data?
- A rider on this device: pick “Delete this rider…” in the rider list at the top, or ✕ in Projects. Online copies stay.
- A rider online: ✕ next to it in Projects. It is gone for the whole band, with its versions; events that already have it keep the copy that was handed in.
- A band in a running order (AV company): ✕ on the band, then save the event online; their invite link stops working.
- Everything on this device: clear this site’s data in your browser settings.
- An online stage or event (AV company): ✕ next to it in Projects. The bands’ invite links stop working; their riders stay theirs. Your copy on this device stays.
- Your band or company: Projects → Leave or delete. Owners can delete it (type its name to confirm): it removes its riders, or stages and events, online for every member. Other members can leave.
- Your account: Projects → Leave or delete → Delete my account. Bands or companies you alone belong to go with it. If you are the only owner of one that still has other members, delete it first (or ask the platform admin to make someone else owner).
Which data is stored where?
In your browser (this device only): your riders, Crew’s stages and events, and your sign-in.
Online (a Supabase database, only once you sign in and save): your email address for signing in; band and company names and who belongs to them; riders and stages with every saved version and who saved it; events, running orders and slot links; each slot’s handed-in copy, freeze, accepted and declined versions, the organiser’s note and when the band acknowledged a stage; and a log of invitation emails (address, who sent it, whether it went out).
Fonts come from Google Fonts, and the online part loads its code from jsDelivr when you open Projects.
Timetable
Why can’t I type a start and end time per band?
Times are worked out for you. Set when the first band goes on and the usual set length; each band then starts after the changeover before it. A set’s length follows the bill, so change it per band where needed. A changeover gets the time its changeover list needs; a soundcheck follows the band’s number of inputs. Type a band’s own minutes only when it differs; clear the field to go back to the default.
What do the colours mean?
One standard for every stage. Each line has one colour, as on multicore tails, repeating every ten: 1 brown, 2 red, 3 orange, 4 yellow, 5 green, 6 blue, 7 violet, 8 grey, 9 white, 10 black, then 11 brown again. The number goes with it. The stagebox is the background colour: A blue, B white, C grey, D yellow, E green, F pink, G orange, H lilac. Tape cables and boxes the same way.
Instruments follow one standard too, like the colour coding of pipes: one tape colour per kind of source, and the label written on the tape says which one (Gtr 1, Gtr 2, Violin). Drums & percussion blue, bass light blue, guitars green, keys red, vocals pink, brass & wind orange, bowed strings yellow, electronics & playback white, other mics and lines grey. All are standard gaffer or spike tape colours that show on black cable. Bands don’t choose; the same source has the same colour on every rider, stage plan, patch sheet and cable. Only the musician’s marker has a colour of its own.
Labels with a QR code?
Bands: Print / PDF → Format → Labels prints a label per instrument in its colour, with its name (Gtr 2), the band and a QR code; choose how many copies (cable, amp, pedalboard). Crew: in the print window, Labels: lines & stageboxes prints a flag for every line cable (fold it around the cable) and a label per stagebox. Sheets are A4 with 3 × 7 labels of 63.5 × 38.1 mm. A scan opens the item in the crew app: where it goes, for which band and when. The code names the item, not a show, so a label lasts a whole tour.
When are the soundchecks?
In Event → Soundcheck, per day: the order of the soundchecks. It starts as the running order; move bands with ↑ ↓, or take a band out (✕); Same as running order goes back. Type each band’s start and end time; they go on the timetable. Nothing is worked out for you. When the soundcheck order is not the show order, Show day lists Soundcheck changeovers under the changeovers, and the Print window can print them. The show’s first changeover then starts from the last band that checked.
An event over several days?
Add a day with + Day next to the timetable. Each day has its own date, times and running order; move a band with its Day field. The stage carries on overnight: the first band of a day is set up with the last band of the day before in mind, and its changeover list says so. Pick All days in the list next to the event to see every day at once; the Print window prints one day or all of them. The printed Equipment pages show what the house gives out: per band for one day, or per day with the peak for the whole event, against what the stage has.
What does a red changeover mean?
The minutes you typed are less than the estimated work on that changeover list (the more mics, stands, amps and wedges move, the longer it takes). Hover the field for the estimate; the timetable beside the running order says “tight: about … min of work”. Without typed minutes, the changeover gets that time by itself.
Can I plan a slot before I know the band?
Yes: press + ? under Add a band. The “?” slot counts in the timetable. Later, pick the band in it and press Fill, or save the event online and send the slot’s invite link so the band hands in its own rider.
I removed a band. Can I put it back?
Yes. A band you remove keeps its rider under Removed from a running order in the Add a band list, next to bands from your other events.
How does the changeover list keep the crew’s work down?
Each band is set up with the band before it in mind. Where two lines or two backline items fit a band equally well, it gets the one where the previous band left the same mic, DI or stand, at about the same place, so it stays. Each crew’s list is in working order: warnings, then strike, move and set up. Change the running order and every changeover is worked out again. When another order needs clearly fewer actions (with the last band kept last), the running order suggests it.
Who sorts out the power when a band’s gear runs on other mains?
The band only says where its gear comes from (Territory on the Band card: voltage and plug). The AV company sets the mains of its stage (Stage → Stage), and for each band whose gear differs it chooses who converts, on the band’s card in the running order: AV company or Band, per event, since a venue on a tour may not be able to. The choice prints on the band page and the backline check, and the converter shows up in the changeover list.
Printing
Why does a page continue on the next one instead of shrinking?
Every page prints at the same text size, with the same header. What doesn’t fit continues on the next page under the same header; tables repeat their heading row. Only drawings may get a little smaller to save a page. The one exception is the Condensed rider, one page per stage plan by design: there only the body shrinks, not the header. Page numbers (“2 / 5”) are on by default; switch them off in the print window.
How do I get a clean PDF?
Press Print / PDF and then Download PDF: the PDF is made from exactly the pages you see. If the PDF service is unreachable, use Print: choose Save as PDF, paper A4, margins default, and switch on background graphics.
In Crew, the Print window can take several kinds of pages at once (timetable, house patch, equipment with the backline check, per band, changeovers, soundcheck changeovers, labels) and, for an event of several days, one day or all of them. The screens themselves don’t print: use the Print window.
Can I print the rider in Chinese?
Print window → Print language: 中文, or English + 中文 side by side. Headings and standard terms are translated; terms the app doesn’t know stay in English. What you type yourself (names, remark, notes, models) is printed as you typed it, so write it in both languages if you need to.
The Chinese font comes from Google Fonts: open the page once with a connection before you print.
Stage, positions and backline
Stage left or stage right?
The stage plan is drawn as the audience sees it, with the audience at the bottom. So the left of the drawing is stage right (the performers’ right when they face the audience), and the right of the drawing is stage left. The plan says “STAGE R” and “STAGE L” on its sides.
SR / SC / SL in the house patch and the changeovers mean the right, centre and left third of the stage width.
How are positions in metres measured?
Across the stage: from the stage-right edge (the left edge of the drawing) to the centre of the item. Specials are also given from the front edge. Every band is laid out on the AV company’s stage size, so the distances are real for that stage; what a band dragged on its own plan is scaled to that size.
The changeover lists ignore small differences: backline within 0.5 m and wedges within 0.4 m “stay where they are”.
Where do the lighting specials come from?
Every musician with Spotlight ticked (Band tab) gets a special, numbered S1, S2… The band page and the lighting section list each special’s position from stage right and from the front edge, with the band’s wishes (colours, avoid, strobe, haze, front light, notes). The changeover tells the lighting crew which specials to refocus, add or drop.
What do the roles in the house patch do?
Each house line has a role (kick in, snare top, lead vocal, bass DI, keys L…). A band’s inputs go to the line with the same role. When those lines are taken, similar roles are tried (a backing vocal can use a guitar-vocal line), then lines without a role (“free line”): lines on the desk first, in the stagebox where the rest of that instrument is. An input with no line left is listed as short. To put an input on another line yourself, click the band’s cell in the house patch.
A guitar amp mic line belongs to one of your house amps: the guitarist who gets that amp lands on its line. The house mic or DI on a line is the default; if a band asks for another one, its cell in the house patch and its input list say which.
Why did a band get a different amp than it asked for?
For each musician who asks the venue for an amp or kit, the inventory is searched in this order: the exact model, one of their alternatives (“also fine”), the same brand, then the same type (combo, stack, head + cab). The best matches over the whole band are handed out first, and an item can’t be given out more often than its quantity.
Each band’s screen under Shows gives the result: ✓ exact, ✓ preferred (an alternative, or the same brand and type), ≈ substitute (with the reason), house gear (no preference), band brings, or ✕ not available.
Bands: list alternatives you’re happy with, or set Amp supplied by: Band if you bring your own.
What do the warnings mean?
In Crew: the warning at the top (“⚠ 3 shortages”) opens a list per band: what is missing, what it is for, and how to fix it. For a mic or DI, each input that uses it has its own choice: pick a spare item from your stock that does the same job for the inputs you choose (the band page then says “instead of …”); pick the original again to undo (see stand-ins). Add to the inventory is for gear you hire or bring in. For a missing house line, a button opens the house patch. Each band’s screen under Shows and the printed Equipment pages carry the same list.
Working in Crew
Why does Crew change when I edit a rider in the Rider Builder?
A band you added from the Rider Builder on this device stays in step with it. The slot is linked to that rider; a slot without a link is linked to the rider with the same band name. Each time you come back to the Crew page, it takes the rider’s latest state, without a question. So you edit the rider in one place only, and Crew always shows what the Rider Builder shows.
This does not apply to a slot that is shared online: there the band hands in versions, and after the freeze you accept or decline them (Projects).
What does the number in the dot mean?
In the house patch (on screen and printed), each band column shows a coloured dot on every line the band uses. The number in the dot is the band’s own channel number, from the band’s input list; the input name is next to it. The dot has the colour of the instrument. So each cable can be told apart, and the band’s engineer finds their channel 7 on your line 12.
How do I change the order of a band’s desk channels?
Open Stage → Console and pick the band (◀ ▶). Drag a channel’s name strip (at the bottom) and drop it between two others. The channel numbers stay and the band’s inputs move between them. The stage lines don’t change, and the X32 scene of that band follows the new order. The order is kept per band. ↺ Original order puts it back.
How do stand-ins work?
When a band needs more of a mic or DI than you have, you can use another item from your stock that does the same job (a mic of the same use, another DI). Choose it per input: in the Mic / DI column of the band’s inputs (Shows), in the shortages pop-up (⚠ in the top bar), or in the Console’s Mic / DI row. In Shows and in the pop-up, the dropdown says how many are spare. The band’s pages then say “instead of …”, and the console marks the channel with *. Pick the original again to undo. A stand-in is for this band on this event only.
Can I undo a change?
Yes. In Crew, ↶ and ↷ in the top bar undo and redo every change in Event, Stage, Shows and Show day (Ctrl+Z; Ctrl+Shift+Z or Ctrl+Y). Up to 100 steps are kept while the page is open. The full-screen stage plan of a band has its own ↶ ↷.
In the Rider Builder, ↶ ↷ above the stage editor undo and redo changes to the stage plan. For other changes, open an older version of a rider saved online (see older versions).
Mixing desk
What is in the X32 / M32 scene?
Channel names (12 characters), colours (the nearest X32 colour), preamp gain, 48V on or off, linked stereo pairs, the monitor bus names and the monitor sends the band asked for. Nothing else: no routing, EQ or dynamics.
- Only desk channels 1–32 go in the scene; lines that don’t reach the desk are listed before you download.
- The gains (+30 dB for mics, +10 dB for DIs) are starting points, not a soundcheck.
- From Crew, when the stage has an X32 / M32 (Show day → X32 scene, on each changeover): built on the desk patch of your stage (Stage → Desk patch): for each stagebox, the port it’s on (local inputs, the console’s network ports such as AES50 on an X32 or Dante on a Yamaha CL / QL, or not on the desk), its first input and its first desk channel. Gain and 48V go to the right preamps, also on stageboxes. Stage → Desk patch says how to set it on your console: on an X32 / M32 the routing per block of eight (Setup → Routing → Home: inputs 1–8, 9–16 …, each from one block of 8 inputs on one port, starting at 1, 9, 17 …), on desks that patch per channel (Yamaha, Allen & Heath, DiGiCo, Wing) the channels per port, and the full list of desk channels with their line. First input and first desk channel are picked from what the console allows (on an X32 the starts of its blocks of eight, within the 48 inputs of an AES50 port). Channels sets how many of a box’s lines go to the desk, so a 12-line box can send only its first 8 and the next box follows on; on an X32 that is per eight or all. It warns when a box doesn’t line up with the X32’s blocks, when two boxes overlap, or when lines don’t fit on the desk.
Load it in X32-Edit or on the desk, and check it before the line check.
My desk isn’t an X32. What can I export?
The X32/M32 scene is the only desk file for now. For any other desk, the printed House patch and Per band pages carry the channel names, mics, 48V and monitor mixes.